![2BTech_FavIcon-WHITE-OUTLINE.png]](https://kb.2btech.io/hs-fs/hubfs/2BTech_FavIcon-WHITE-OUTLINE.png?height=1412&name=2BTech_FavIcon-WHITE-OUTLINE.png)
Technical Note No. 030
Cleaning Procedure for Model 410 Nitric Oxide Monitor
Date: 28 July 2011
Author: Craig Williford, Stanley Strunk
Summary:
It is recommended that Nitric Oxide Monitors be returned to 2B Tech at least once
annually for calibration. This includes cleaning of the entire flow path and installation of
a new internal scrubber. If the flow path becomes contaminated, as evidenced by large
positive or negative offset (Z) and/or low slope (S) calibration parameters, it may be
necessary to clean the flow path and replace the scrubber. This can be done by the
user if desired. The procedure involves the following steps:
I. Preparing the instrument for cleaning
A. Removing top and bottom covers
B. Disconnecting electrical connections
C. Bypassing parts in plumbing line part 1
D. Bypassing parts in plumbing line part 2
II. Cleaning the instrument
A. Inlet
B. Sample Flow and Total Flow Meters
C. Reaction Coil and Detection Cell
III. Reconnecting plumbing and connections
A. Reconnecting plumbing to bypassed parts
B. Connecting electrical connections
C. Replacing top and bottom covers
Tools needed:
-Philips head screw driver
-12” of Tubing for directing waste flush into waste container
-Methanol (methyl alcohol)
-Squirt bottle
-Compressed Clean Zero Air
Warning: This procedure makes use of the toxic and flammable solvent methanol,
and appropriate care should be taken. Although a relatively safe solvent to work with,
as with all solvents appropriate care should be taken. Remove any clothing
contaminated with methanol. If methanol contacts your skin, wash the affected areas
with soap and water for at least 15 minutes. If methanol gets in your eyes, wash your
eyes with water for at least 15 minutes, occasionally lifting and lowering the upper and
lower eyelids and seek medical help.
I. Preparing the instrument for cleaning
A. Removing top and bottom covers
i. Remove 4 philips head screws on back of instrument.
ii. Remove top and bottom covers by pulling up and back so covers slide off.
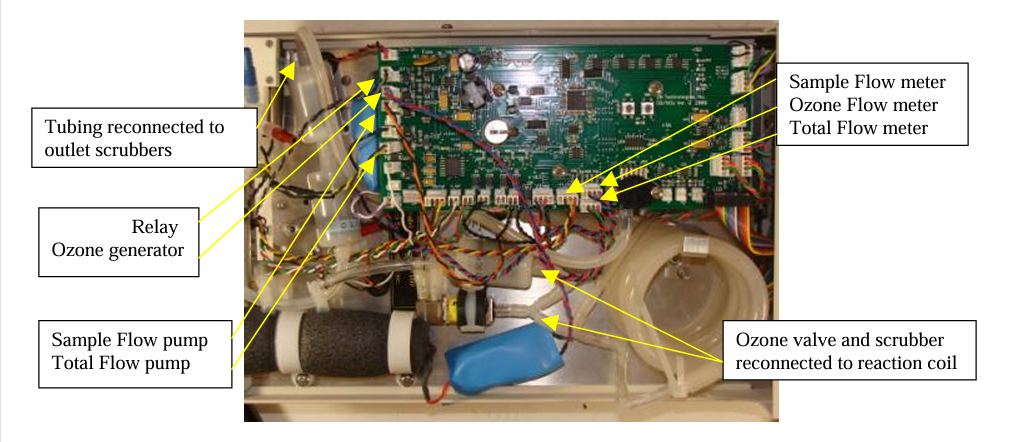
B. Disconnecting electrical connections (see fig 6)
i. Locate circuit board on top of instrument.
ii. Remove the following connections:
1. Flow Meters: Total Flow J9; Sample Flow J32; Ozone Flow J32
2. Sample and Total Flow Pumps- J23 & JJ21
3. Ozone Generator- J22
4. Relay for heated scrubber- J31
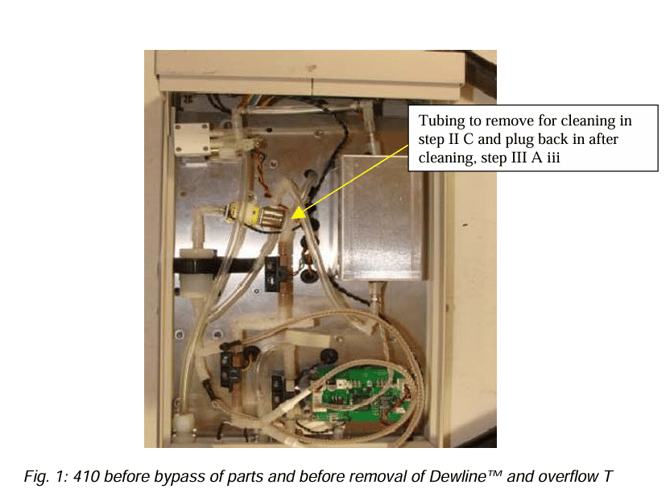
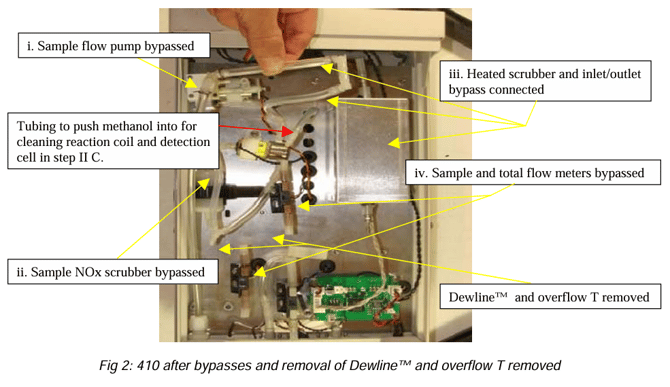
C. Bypassing parts in plumbing line part 1(see fig 1&2)
i. Sample Pump-remove inlet from pump port with silicone attached to tube, remove outlet after needle valve leaving silicone with valve, attach two now removed pieces of tubing
ii. NOx scrubber- add tubing to elbow and connect to “y”- leave silicone connections on inlet/outlet of scrubber
iii. Heated scrubber- leave silicone connection on inlet of scrubber but removing from outlet
iv. Flow Meters- Remove Dewline™ tubing and overflow T between the flow meters and leave silicone connections attached to flow meters.
D. Bypassing parts in plumbing line part 2 (see fig 3)
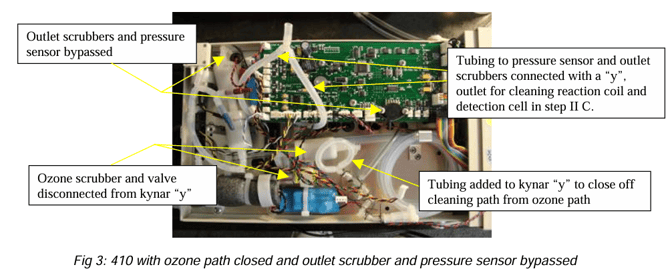
i. Close off path to ozone generator: 1st disconnect kynar “y” from ozone valve and ozone scrubber and connect a piece of silicon tubing to open ends of kynar “y” to close off cleaning path from ozone generator flow path.
ii. Tie together outlet tubing and bypass outlet scrubbers and pressure sensor: unplug silicon tubing from pressure sensor on PCB and tubing into outlet scrubbers and connect together with a kynar “y”.
II. Cleaning Instrument
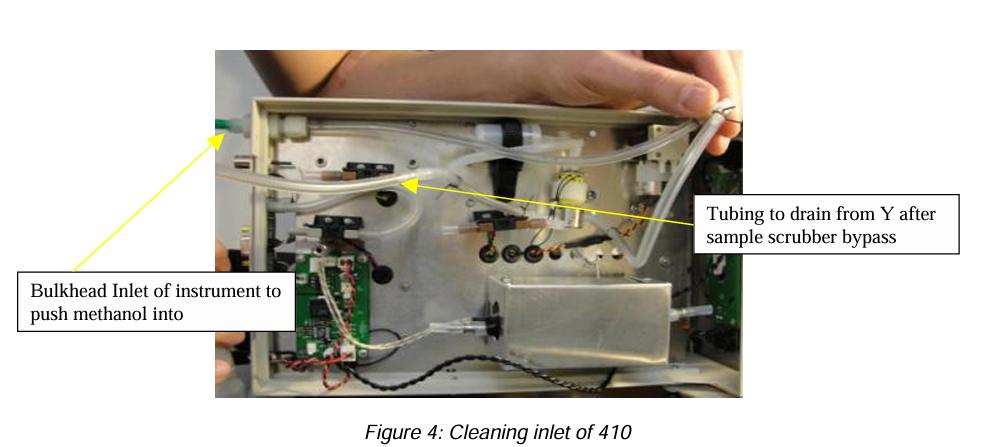
A. Clean inlet path through bypassed sample scrubber, heated scrubber, and sample scrubber.
i. Power instrument and press select switch in x2 to enter into NO mode, the sample valve should switch valve states every 5 sec (BE SURE PUMPS AND FLOW METERS ARE DISSCONNECTED BEFORE CLEANING INSTRUMENT)
ii. Using squirt bottle push methanol into inlet bulkhead of instrument and use a beaker to capture waste after bypass of sample scrubber. Use approx. 200ml of solvent.
iii. Use compressed air to dry flow path cleaned ~ 1 min or so.
iv. Power off instrument for remainder of cleaning procedure.
B. Clean Sample Flow and Total Flow meters
i. Using squirt bottle push methanol through inlet of Flow meters and capture waste with tubing and beaker on outlet of flow meters. Use approx 100ml for each flow meter.
ii. Dry completely flow meters with compressed air.
Warning any residual moisture left in the flow meters will cause them to short when powered!
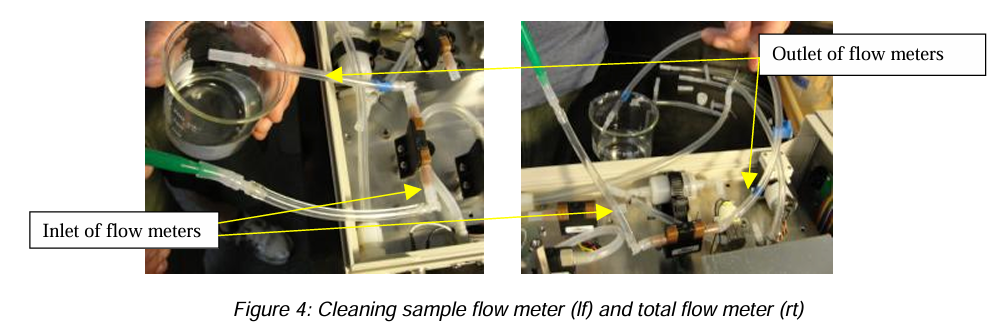
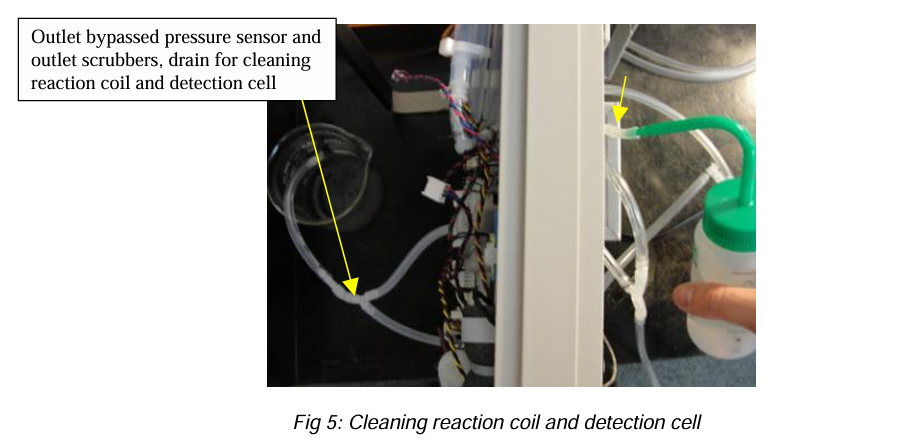
C. Clean reaction coil and detection cell (see fig 2 red arrow and fig 4)
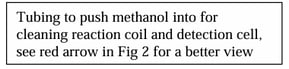
i. With instrument on side, push methanol into tube leading through base plate and into the reaction coil, (fig 2 red arrow) use approx 200-300ml of solvent.
ii. With tubing and beaker collect waste from outlet tubing tied together bypassing outlet scrubbers and pressure sensor.
iii. Dry thoroughly with compressed air ~ 2-5 minutes.
III. Reconnecting plumbing and connections
A. Reconnecting plumbing to bypassed parts
i. Sample flow pump, heated scrubber and sample scrubber (see figure 1).
ii. Put back Dewline™ and overflow T (see figure 1).
iii. Plug back into outlet of total flow meter tubing going through base plate toward reaction coil.
iv. Remove loop from kynar Y and reconnect ozone valve and scrubber (figure 6).
v. Plug tubing back into inlet of outlet scrubbers and tubing to pressure sensor (figure 6).

B. Connecting electrical connections (see fig 6)
i. Flow Meters: Total Flow J9; Sample Flow J32; Ozone Flow J32
ii. Sample and Total Flow Pumps- J23 & JJ21
iii. Ozone Generator- J22
iv. Relay for heated scrubber- J31
C. Replacing top and bottom covers
i. Slide bottom and top of enclosure in and push down into place.
ii. Screw in 4 corner screws on back of instrument.
iii. Run instrument for a few hours (4-8hrs) before evaluating.